#StandWithUkraine - Stop the Russian invasion
Join us and donate. Since 2022 we have contributed over $5,000 in book royalties to Save Life in Ukraine & Ukraine Humanitarian Appeal & The HALO Trust, and we will continue to give!
Leaflet Maps with Google Sheets
Sometimes you need to create a map that cannot be made easily with drag-and-drop tools, because you need to customize its appearance or show some combination of point, polygon, or polyline data. One solution is to build your map based on our Leaflet Maps with Google Sheets code template, which allows you to display custom point icons, pick any choropleth color palettes, and stack different combinations of map data layers, as shown in Figure 12.1. If you’ve explored prior chapters in this book, this template is a good template for newer users, because you enter your map data and settings in a linked Google Sheet, as shown in Figure 12.2, and upload images or geographic files into a folder in your GitHub repository. All of the data you enter can easily be exported and migrated to other platforms as visualization technology continues to evolve in the future, as we discussed in the how to choose tools section in Chapter 1. Furthermore, the map design is responsive, meaning it automatically resizes to look good on small or large screens. Finally, the Leaflet Maps template is built on flexible open-source software that’s written primarily in JavaScript, a very common coding language for the web, so you can customize it further if you have skills or support from a developer.
Figure 12.1: Explore the interactive Leaflet Maps with Google Sheets. This demo version shows the East Coast Greenway, a walking-biking route that connects cities between Maine and Florida. Over one-third of the 3,000-mile route is on traffic-free trails as of 2021. To learn more, see the official Greenway map.
Figure 12.2: View the online Google Sheet template that feeds data into the Leaflet Maps demo above.
Tutorial Requirements and Overview
Before you begin, you must have a Google Drive account and know how to Make a Copy in Google Sheets as described in Chapter 2. Also, you must have a GitHub account and know how to Edit and Host Code with GitHub as described in Chapter 10. We omitted some screenshots below that illustrate steps we previously covered, so if you get lost, go back to those chapters.
Since this tutorial involves multiple steps, we created this outline to provide a broad overview. In the first part, you will create and publish your copies of two templates, one for GitHub and another for its linked Google Sheet.
- Copy the GitHub template and publish your version with GitHub Pages.
- File > Make a Copy of Google Sheet template, Share, and Publish.
- Paste your Google Sheet browser address in two places in your GitHub repo.
- Update your Google Sheet Options tab info and refresh your live map.
In the second part, you will learn how to upload and display different types of map data, such as points, polygons, and polylines, and to edit colors, icons, and images, by entering data into the linked Google Sheet and uploading files to your GitHub repo.
- Geocode locations and customize new markers in the Points tab.
- Remove or display point, polygon, or polylines data and legends.
In the third part, you have two options to finalize your map before publicly sharing it with others:
- Save each Google Sheets tab as a CSV file and upload to GitHub.
- OR
- Get your own Google Sheets API Key to insert into the code.
If any problems arise, see the Fix Common Problems section of the appendix.
Now that you have a better sense of the big picture, let’s get started with the first part of the tutorial.
A) Copy the GitHub template and publish your version with GitHub Pages
Open the GitHub code template in a new tab.
In the upper-right corner of the code template, sign in to your free GitHub account.
In the upper-right corner, click the green Use this template button to make a copy of the repository in your GitHub account. On the next screen, name your repo
leaflet-maps-with-google-sheetsor choose a different meaningful name in all lower-case. Click the Create repository from template button. Your copy of the repo will follow this format:
https://github.com/USERNAME/leaflet-maps-with-google-sheets
- In your new copy of the code repo, click the upper-right Settings button and scroll way down to the GitHub Pages area. In the drop-down menu, change Source from None to Main, keep the default /(root) setting, and press Save as shown in Figure 12.3. This step tells GitHub to publish a live version of your map on the public web, where anyone can access it in their browser, if they have the web address.
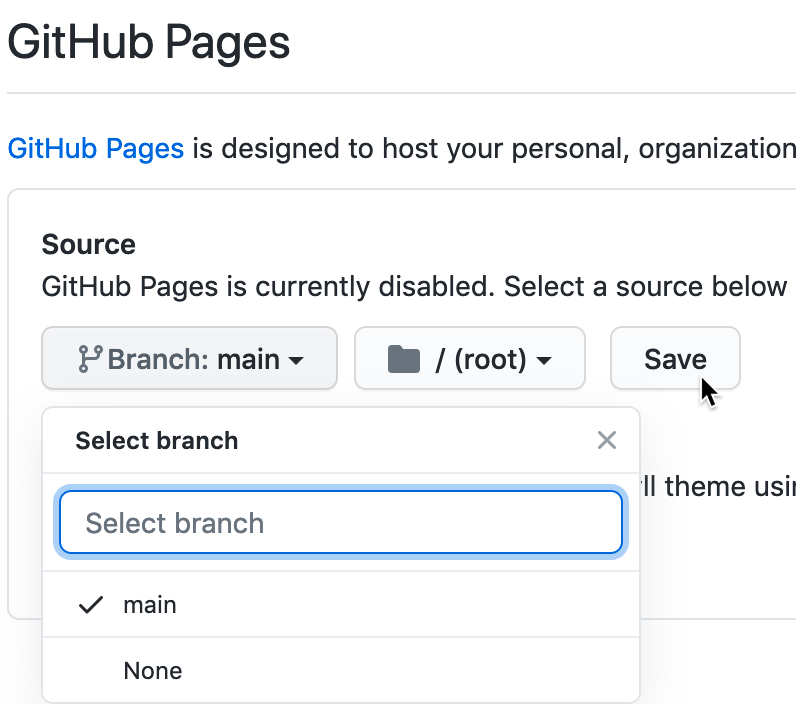
Figure 12.3: In Settings, go to GitHub Pages, switch the source from None to Main, and Save.
- Scroll down to GitHub Pages section again, and copy the link to your published web site, which will appear in this format:
https://USERNAME.github.io/leaflet-maps-with-google-sheets
Scroll up to the top, and click on your repo name to go back to its main page.
At the top level of your repo main page, click on README.md, and click the pencil icon to edit this file.
Delete the link to the our live site, as shown in Figure 12.4, and paste in the link to your published site. Scroll down to Commit your changes.

Figure 12.4: Edit your README file to replace the link to our site with the link to your site.
- On your repo main page, right-click the link to open your live map in a new tab. Be patient. GitHub Pages normally will display your live map within 30 seconds, but sometimes it may require several minutes to appear.
B) File > Make a Copy of Google Sheet template, Share, and Publish
Open the Google Sheets template in a new tab.
Sign into your Google account, and select File > Make a Copy to save your own version of this Google Sheet on your Google Drive.
Click the blue Share button, and click Change to anyone with the link, then click Done. This publicly shares your map data, which is required to make this template work.
Go to File > Publish to the Web, and click the green Publish button to publish the entire document, so that the Leaflet code can read it. Then click the upper-right X symbol to close this window.
At the top of your browser, copy your Google Sheet address or URL (which usually ends in
...XYZ/edit#gid=0), as shown in Figure 12.5. Do NOT copy the Published to the web address (which usually ends in...XYZ/pubhtml) because that link is slightly different and will not work in this template.
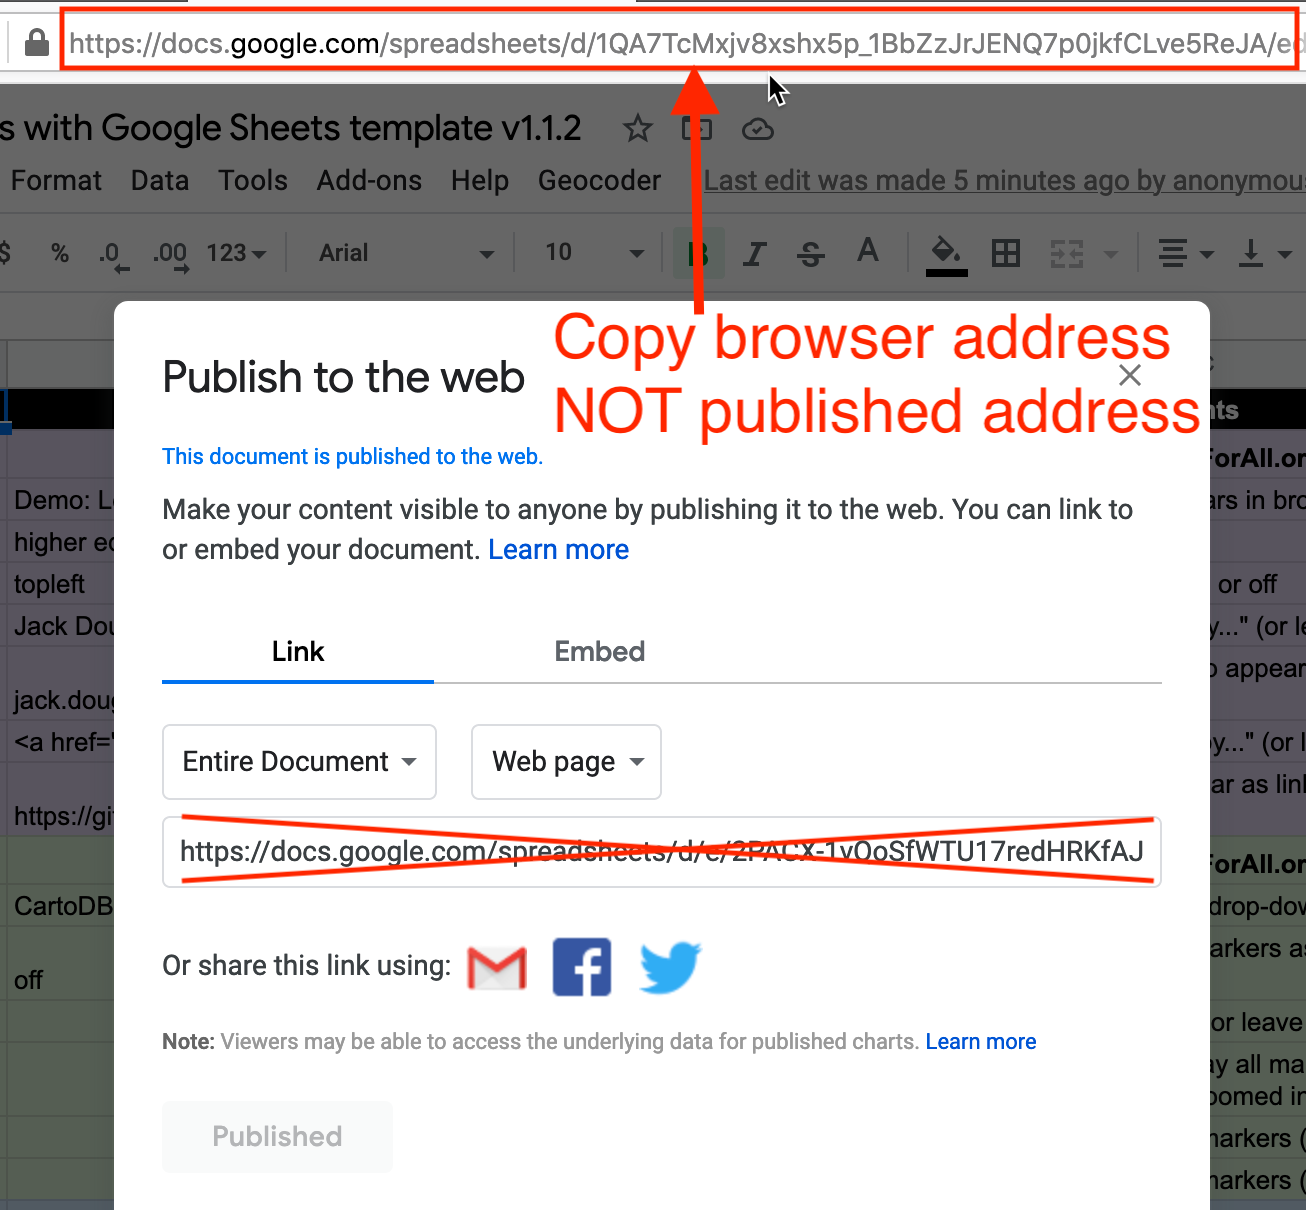
Figure 12.5: Copy the Google Sheet address at the top of the browser, NOT the Publish to the web address.
C) Paste your Google Sheet browser address in two places in your GitHub repo
Our next task is to link your published Google Sheet to your Leaflet code in GitHub, so that it can pull your data from the Sheet to display on the map.
At the top of your GitHub repo, click to open the file named
google-doc-url.js, and click the pencil symbol to edit it.Paste your Google Sheet address or URL (which usually ends in
...XYZ/edit#gid=0) to replace our existing URL, as shown in Figure 12.6. Be careful NOT to erase the single quotation marks or the semicolon at the end. Scroll down to Commit your changes. See separate instructions about the Google API key further below.
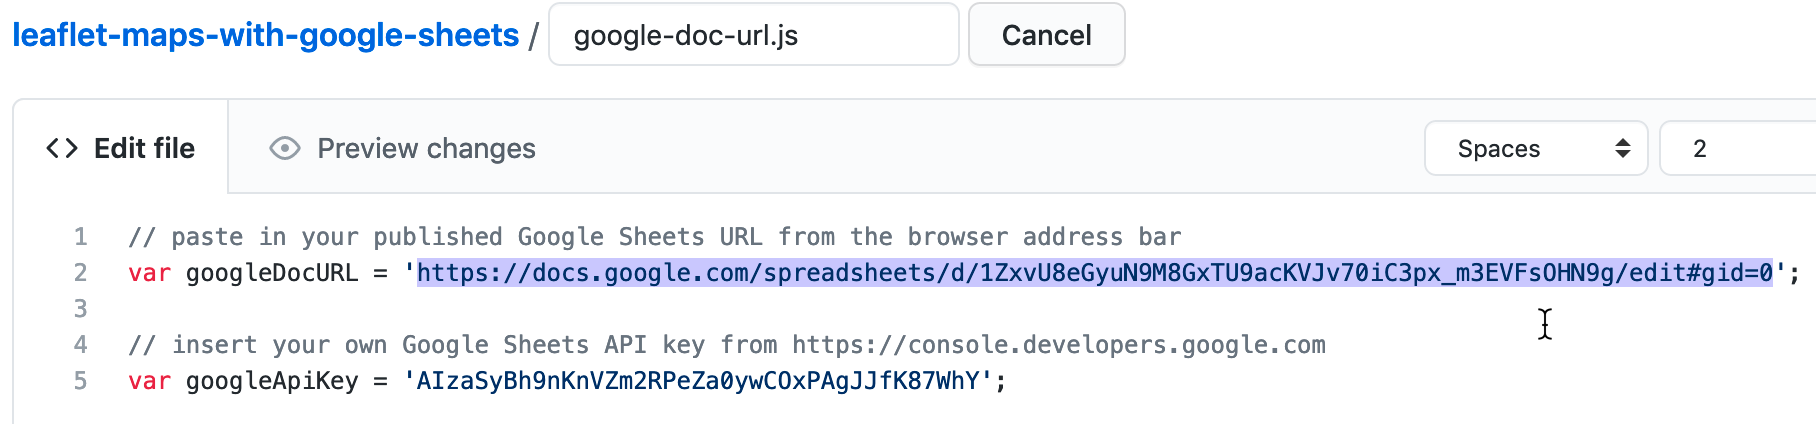
Figure 12.6: Paste in your Google Sheet URL to replace our URL.
- Also, let’s paste your Google Sheet URL in second place to help you keep track of it. In your GitHub repo, click the README.md file to open it, click the pencil symbol to edit it, and paste your Google Sheet URL to replace our existing URL, as shown in Figure 12.7. Scroll down to Commit your changes.

Figure 12.7: Edit your README file to replace the link to our site with the link to your site.
Feel free to remove any other content on the README page that you do not wish to keep.
D) Update your Google Sheet Options tab info and refresh your live map
Now that your published Google Sheet is linked to your live map, go to the Options tab to update these and other settings:
- Map Title
- Map Subtitle
- Author Name
- Author Email or Website
- Author Code Repo
- and many more
Open the browser tab that displays your live map and refresh the page to see your changes. If your changes do not appear within a few seconds, see the Fix Common Problems section of the appendix.
Tip: In Google Sheet Options > Map Settings > Basemap Tiles, the default option is the CartoDB.Positron basemap. If you choose options by other Leaflet basemap providers, you may need to register for and insert an API key to use their service. If you choose a Stadia basemap, register for an account to use domain-based authentication, as shown in Figure 12.8.

Figure 12.8: If you choose a Stadia basemap option, register to use domain-based authentication. For example, handsondataviz.github.io is the domain for our demo map on GitHub Pages.
E) Geocode locations and customize new markers in the Points tab
Now we can start to add new content to your map. In the Points tab of your Google Sheet, you’ll see column headers to organize and display interactive markers on your map. Replace the demonstration data with your own, but do not delete or rename the column headers, since the Leaflet code looks for these specific names.
- Group: Create any labels to categorize groups of markers in your legend.
- Marker Icon: Insert a Font Awesome free and solid icon name such as
fa-ice-creamorfa-coffee, or any Material Design icon name such asrowingorwhere_to_vote, as shown in Figure 12.9. Or leave blank for no icon inside the marker. Note that Font Awesome pro or brand icons do not work with this template. To create your own custom icon, see further below. - Marker Color: Insert any standard web color name such as
blueordarkblue, or insert a web color code such as#775307orrgba(200,100,0,0.5). See options at W3Schools Color Names. - Icon Color: Set the color of the icon inside the marker. The default is
white, which looks good inside darker-colored markers. - Custom Size: Leave blank, unless you are creating your own custom icon further below.
Figure 12.9: For a Marker Icon, insert a Font Awesome free and solid icon name such as fa-ambulance (on the right), or any Material Icon name such as accessible (on the left).
The next set of columns include items that appear when users click on point markers:
- Name: Add a title to display in the marker pop-up window.
- Description: Add text to appear in the marker pop-up window. You may insert HTML tags to add line breaks (such as
<br>), or to open external links in a new tab, such as<a href='https://www.w3schools.com/' target='_blank'>Visit W3Schools</a>. Learn about HTML syntax at W3Schools. - Image: You have two options to display images. You can insert an external link to an image hosted by an online service (such as Flickr), as long as it begins with
https(secure) and ends with either.jpgor.png. Or you can upload an image into themediasubfolder in your GitHub repo, as shown in Figure 12.10, and enter the pathname in the Google Sheet in this format:media/image.jpgor...png.

Figure 12.10: In GitHub, click to open the media folder and Add file - Upload files.
Warning: Media file pathnames are case-sensitive, and we recommend using all lowercase characters, including the suffix ending. Also, since the code template automatically resizes images to fit, we recommend that you reduce the size of any images to 600x400 pixels or less prior to uploading, to make sure your map operates smoothly.
Tip: Some people accidentally erase the entire media folder. For example, if you delete all of the contents of a GitHub repo folder, that action also deletes the folder, because GitHub does not keep track of empty folders. To create a new folder in your GitHub repo, go to Add file - Create new file, then type the folder name followed by a slash (such as media/), then type a temporary file name (such as temp.md) to serve as a placeholder so that your new folder will not be empty. Now you can upload files into your new GitHub repo folder.
- Location, Latitude, Longitude: These place your markers at points on the map. Although the code template only requires Latitude and Longitude, it’s wise to paste an address or place name into the Location column as a reminder to correspond with the numerical coordinates. Use the Geocoding by SmartMonkey Add-on from Chapter 2 and select Add-ons > Geocoding by SmartMonkey > Geocode Details to create a new sheet with sample data and display results for three new columns: Latitude, Longitude, and Address found, as shown in Figure 12.11. Paste in your own address data and repeat the step above to geocode it, then copy and paste the results into your Points sheet.
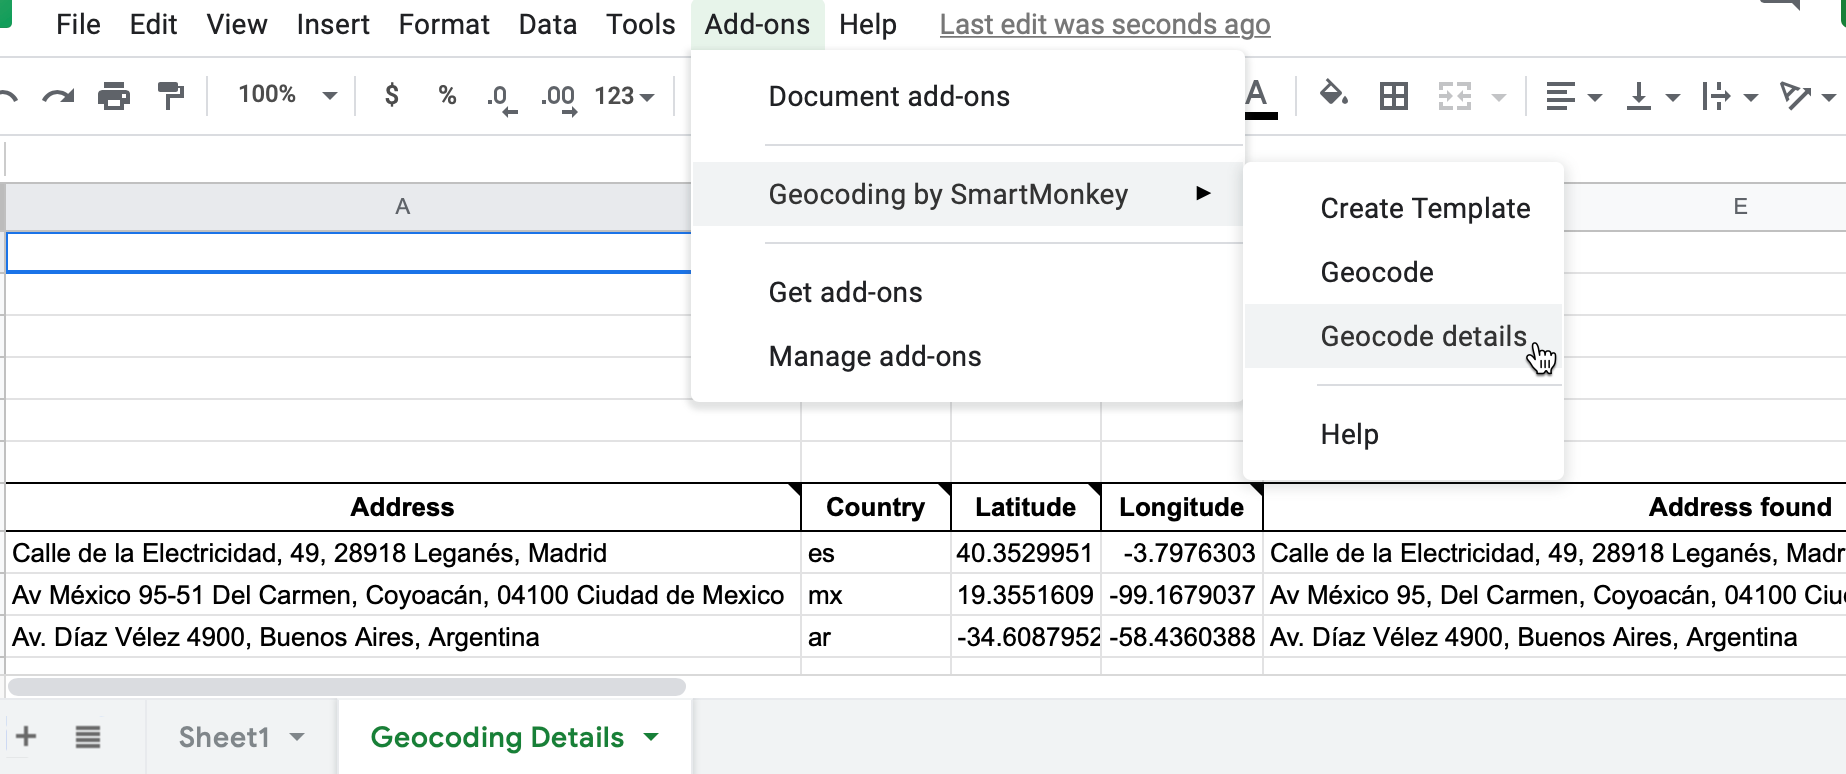
Figure 12.11: Select Add-ons–Geocoding by SmartMonkey–Geocode Details to display sample data with results for three new columns: Latitude, Longitude, and Address found.
Optional table of viewable markers: To display an interactive table at the bottom of your map, as shown in Figure 12.12. In the Options tab, set Display Table (cell B30) to On. You can also adjust the Table Height, and modify the display of Table Columns by entering the column headers, separated with commas.
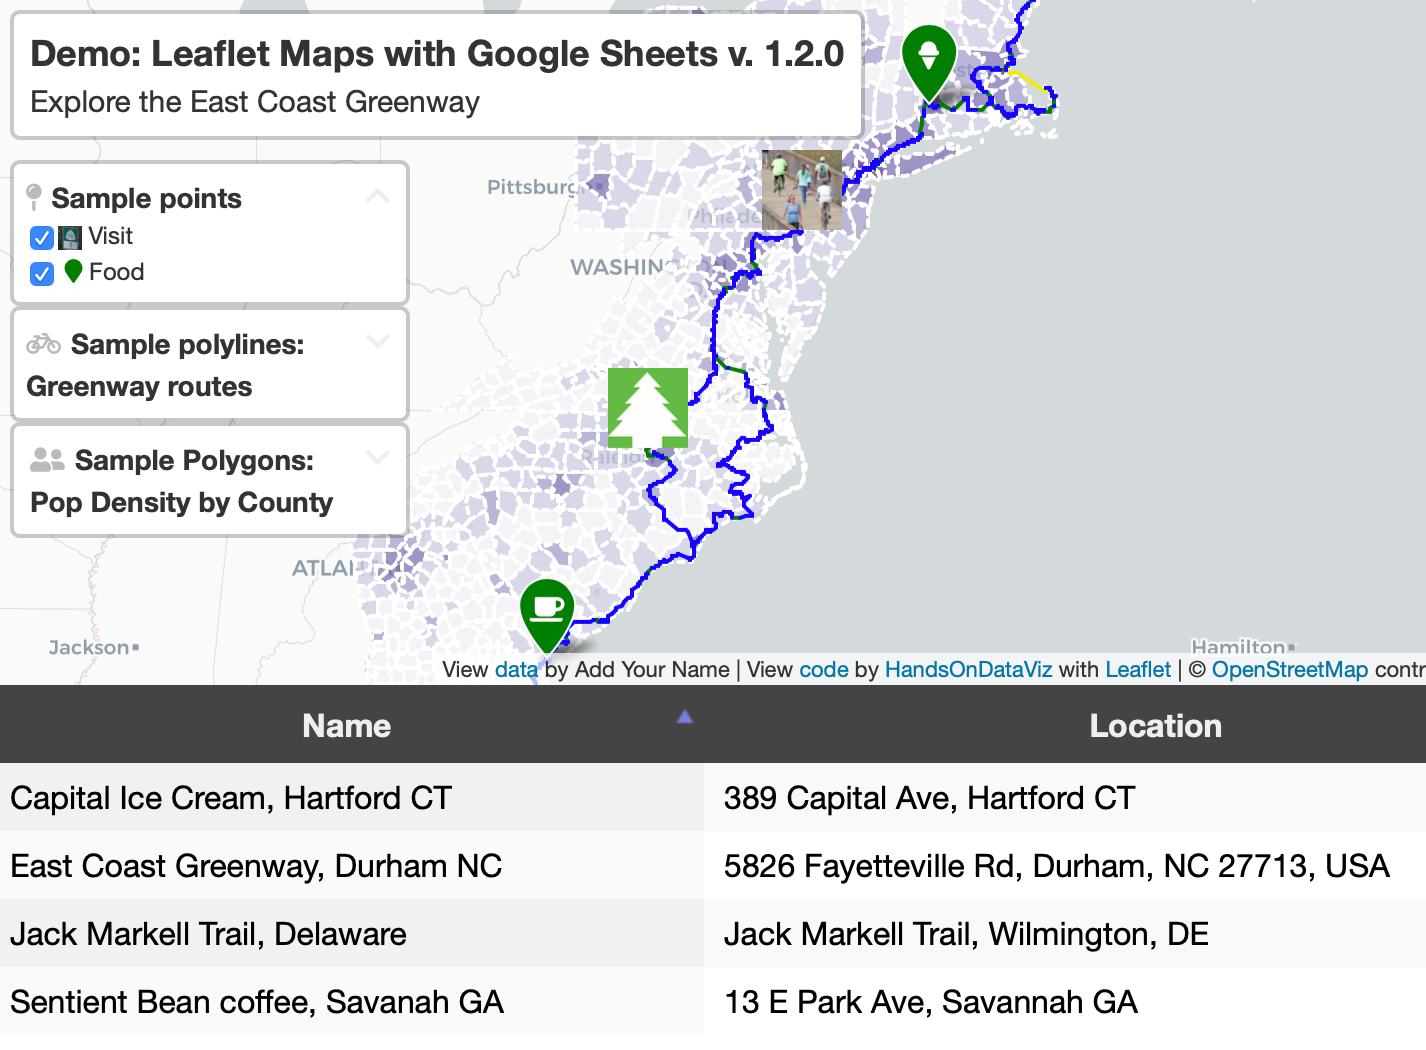
Figure 12.12: Optional: display interactive table of viewable markers at the bottom of your map.
Optional custom markers: To create your own custom marker, such as a thumbnail photo icon as shown in Figure 12.13, use any image editing tool to reduce a photo to a square of 64 x 64 pixels. Save it in PNG format and choose a filename using all lower-case characters with no spaces. Upload the image to the media folder in your GitHub repo as described above. In the Marker Icon column, enter the file pathname in this format: media/imagename-small.png. In the Custom Size column, set the dimensions to 64x64 or similar, such as 40x40 if desired.
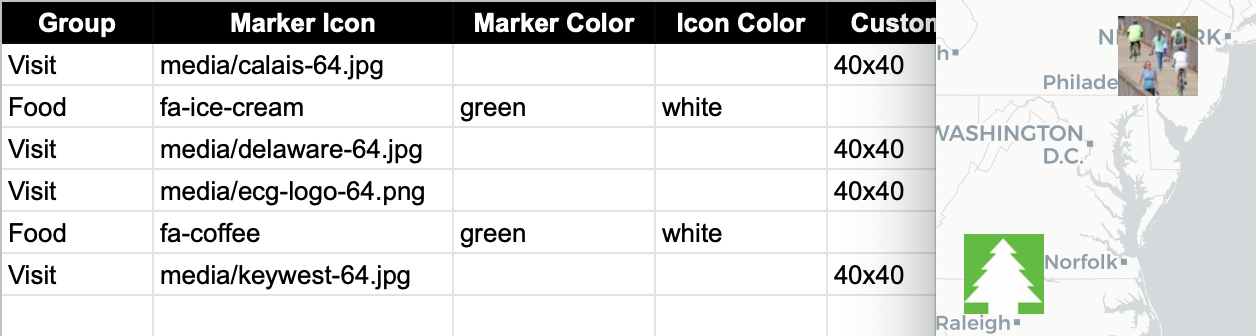
Figure 12.13: Optional: create and upload custom thumbnail map markers.
Open the browser tab that displays your live map and refresh the page to see your changes. If your changes do not appear within a few seconds, see the Fix Common Problems section of the appendix.
F) Remove or display point, polygon, or polylines data and legends
By default, the demo map displays three types of data—points, polygons, and polylines—and their legends. You can remove any of these from your map by modifying your linked Google Sheet:
To remove points:
- In the Options tab, set Point Legend Position (cell B27) to Off to hide it.
- In the Points tab, delete all rows of point data.
To remove polylines:
- In the Options tab, set Polyline Legend Position (cell B36) to Off to hide it.
- In the Polylines tab, delete all rows of polyline data.
To remove polygons:
- In the Polygons tab, set Polygon Legend Position (cell B4) to Off to hide it.
- Also in the Polygons tab, set Polygon GeoJSON URL (cell B6) to remove that data from your map.
- In the next tab Polygons1, use the tab drop-down menu to select Delete to remove the entire sheet.
You’ve already learned how to add more markers in the Points tab as described above. But if you wish to add new polygon or polyline data, you’ll need to prepare those files in GeoJSON format using either the GeoJson.io tool tutorial or the MapShaper tool tutorial as described in Chapter 13.
After you’ve prepared your GeoJSON data, name the files using all lower-case characters and no spaces, and upload them into the geojson subfolder of your GitHub repo. Then update these settings in your linked Google Sheet:
To display polylines:
- In the Options tab, make sure Polyline Legend Position (cell B36) is visible by selecting topleft or a similar position.
- In the Polylines tab, enter the GeoJSON URL pathname to the file you uploaded to your GitHub repo, such as
geodata/polylines.geojson. Then insert a Display Name, Description, and Color.
To display polygons:
- In the Polygons tab, make sure Polygon Legend Position (cell B4) is visible by selecting topleft or a similar position.
- In Polygon GeoJSON URL (cell B6) enter the pathname to the file you uploaded to your GitHub repo, such as
geodata/polygons.geojson. - You can change the Polygon Legend Title (cell B3) and add an optional Polygon Legend Icon (cell B5).
- Edit the Polygon Data and Color Settings sections to modify the labels and ranges to align with the properties of your GeoJSON file. In the Property Range Color Palette, you can automatically select a color scheme from the ColorBrewer tool we described in the Map Design section of Chapter 7, or manually insert colors of your choice in the cell below.
- Read the Hints column in the Polygons sheet for tips on how to enter data.
- If you wish to display multiple polygon layers, use the Polygons tab drop-down menu to Duplicate the sheet, and name additional sheets in this format: Polygons1, Polygons2, etc.
Finalize Your Map Before Sharing with the Public
Now you’re ready to finalize your map. If you wish to share your map link with the public, read the options below and choose either step G OR step H.
Warning: We reserve the right to change our Google Sheets API key at any time, especially if other people overuse or abuse it. This means that you must finalize your map using either step G or H below before sharing it publicly, because it will stop working if we change our key.
G) Save each Google Sheets tab as a CSV file and upload to GitHub
If you have finished entering most of your data into your Google Sheets, downloading them into separate CSV files and uploading those into your GitHub repo is the best long-term preservation strategy. This approach keeps your map and data together in the same GitHub repo, and removes the risk that your map will break due to an interruption to Google services. Plus, you can still edit your map data. If this approach makes sense, follow these steps:
- In your Google Sheets, go to each tab and select File > Download into CSV format, as shown in Figure 12.14, to create a separate file for each tab.
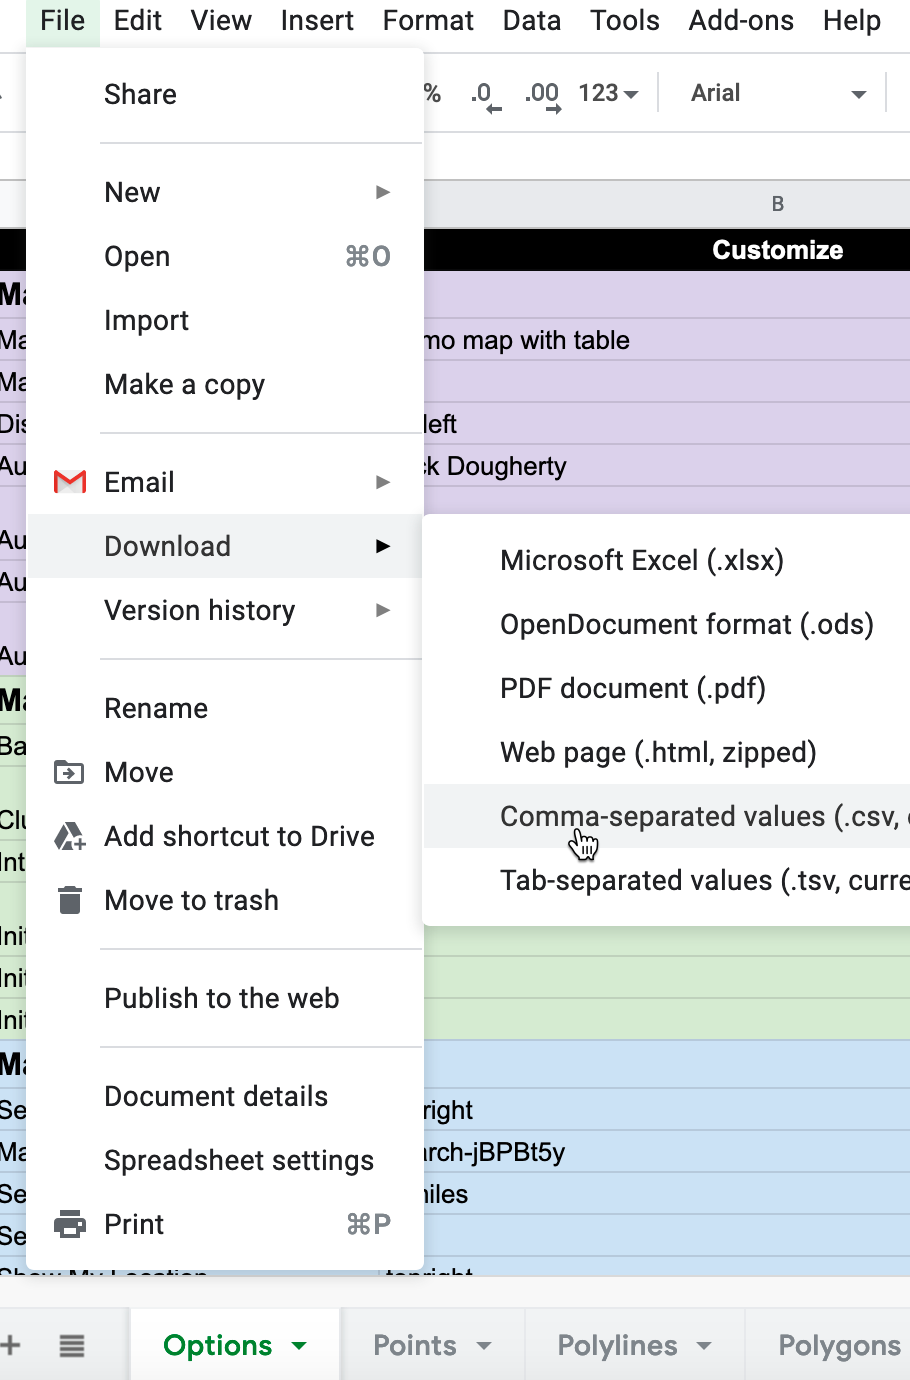
Figure 12.14: Download each Google Sheets tab as a separate CSV file.
- Shorten each file name as shown. Only the first file below (Options.csv) is required, and others are optional, depending on your data. File names must be exactly as shown, such as upper-case for the first letter in Options.csv, and so forth.
- Options.csv
- Points.csv
- Polylines.csv
- Polygons.csv (If additional files, name them: Polygons1.csv, Polygons2.csv, etc.)
- Notes.csv (or .txt) Recommended to keep any notes with your data, but not required.
- In your GitHub repo, click the
csvsubfolder to open it, select Add file > Upload files, and upload all of the CSV files above into this subfolder, as shown in Figure 12.15. The Leaflet template code checks here first for data, and if it finds CSV files with the names above, it will pull the map data directly from them, instead of your Google Sheets. Remember that from this point forward, any edits in your Google Sheet will no longer appear automatically in your map.

Figure 12.15: Upload your map data files into the csv subfolder in GitHub.
- After migrating data from your Google Sheet to the csv subfolder in GitHub, go to the
google-doc-url.jsfile and change the googleDocURL value tonullwith no quotation marks, as shown below. This will change the “data by” attribution link at the bottom of your map from the old data source (your published Google Sheet) to your new source (your csv files on GitHub). Update the code comment as a reminder, as shown below:
// data stored in csv folder on GitHub, not Google Sheets
var googleDocURL = null;- If you wish to edit your map after uploading your CSV files, you have two options. You can make small edits directly to your CSV files by opening them in the GitHub web interface. Or you can make larger edits in the Google Sheet, and repeating the steps above to download them in CSV format and upload them to replace your existing files on GitHub.
H) Get your own Google Sheets API Key to insert into the code
As an alternative to step G, if you wish to continue to store your map data in your Google Sheets that is published online, go to the section of this chapter titled Get Your Own Google Sheets API Key, and insert it into the Leaflet map code as described, to avoid overusing our key. Google Sheets requires an API key to maintain reasonable usage limits on its service. You can get a free Google Sheets API key if you have a personal Google account, but not a Google Suite account provided by your school or business.
If problems arise, see the Fix Common Problems section of the appendix.