#StandWithUkraine - Stop the Russian invasion
Join us and donate. Since 2022 we have contributed over $5,000 in book royalties to Save Life in Ukraine & Ukraine Humanitarian Appeal & The HALO Trust, and we will continue to give!
GitHub Desktop and Code Editor to Work Efficiently
Editing your code through the GitHub web interface is a good way to start, especially if you only need to make a few edits or upload a couple of files to your repo. But the web interface will feel very slow if you edit or upload multiple files in your repo. To speed up your work on Mac or Windows, we recommend that you download the free GitHub Desktop tool, plus any code editor, such as new favorite open-source option, Pulsar, based on the former Atom editor tool, but there are other options. When you connect your GitHub web account to GitHub Desktop, it allows you to “pull” the most recent version of the code to your local computer’s hard drive, make and test your edits, and “push” your commits back to your GitHub web account. Any text editor allows you to view and edit code repos on your local computer more easily than the GitHub web interface.
Tip: Word-processor tools such as Microsoft Word are not good choices for code editors. Also, tools designed primarily as code editors, such as Pulsar, will work better than plain-text editors bundled with operating systems, such as TextEdit for Mac or NotePad for Windows.
Tip: Currently, GitHub Desktop is not supported for Chromebooks, but Chrome’s Web Store offers several text editors, such as Text and Caret, which offer some of the functionality described below.
Let’s use GitHub Desktop to pull a copy of your leaflet-map-simple template to your local computer, make some edits in a code editor, and push your commits back up to GitHub.
- Go to the GitHub web repo you wish to copy to your local computer. In your browser, navigate to
https://github.com/USERNAME/leaflet-map-simple, using your GitHub username, to access the repo you created in the Copy, Edit, and Host a Simple Leaflet Map Template section of this chapter. Click the Code > Open with GitHub Desktop drop-down menu button near the middle of your screen, as shown in Figure 10.18. The next screen will show a link to the GitHub Desktop web page, and you should download and install the application.
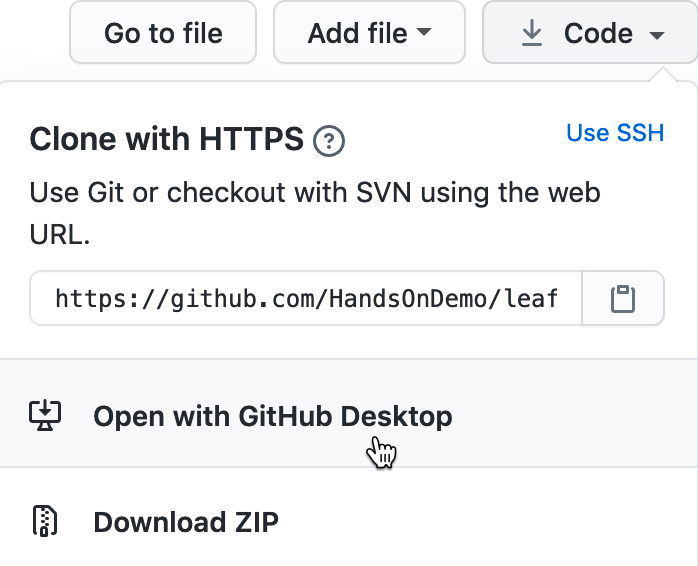
Figure 10.18: In your GitHub repo on the web, click Code to Open with GitHub Desktop to download and install GitHub Desktop.
- When you open GitHub Desktop for the first time, you’ll need to connect it to the GitHub web account you previously created in this chapter. On the welcome screen, click the blue Sign in to GitHub.com button, as shown in Figure 10.19, and login with your GitHub username and password. On the next screen, GitHub will ask you to click the green Authorize desktop button to confirm that you wish to connect to your account.
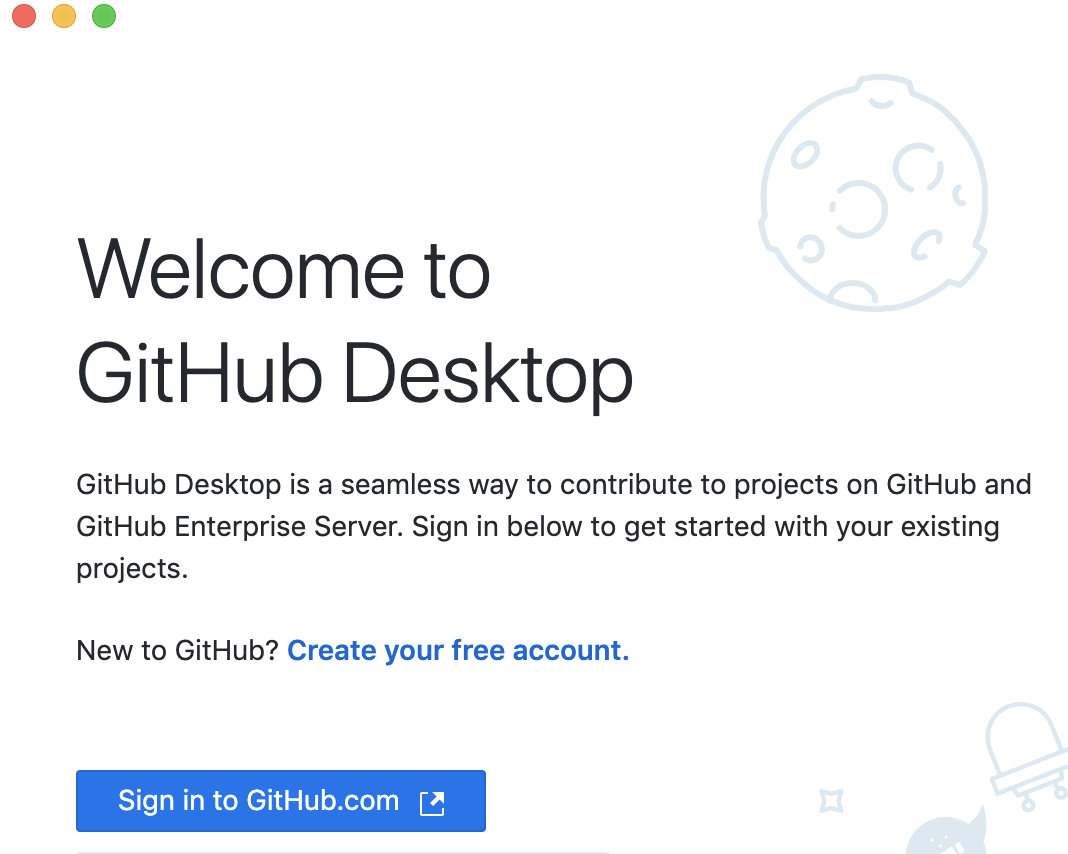
Figure 10.19: Click the blue Sign in to GitHub.com button to link GitHub Desktop to your GitHub account.
- In the next setup screen, GitHub Desktop asks you to configure Git, the underlying software that runs GitHub. Confirm that it displays your username and click Continue, as shown in Figure 10.20.

Figure 10.20: Click the Continue button to authorize GitHub Desktop to send commits to your GitHub account.
- On the “Let’s Get Started” with GitHub Desktop screen, click on Your Repositories on the right side to select your
leaflet-map-sample, and further below click the blue button to Clone it to your local computer, as shown in Figure 10.21.
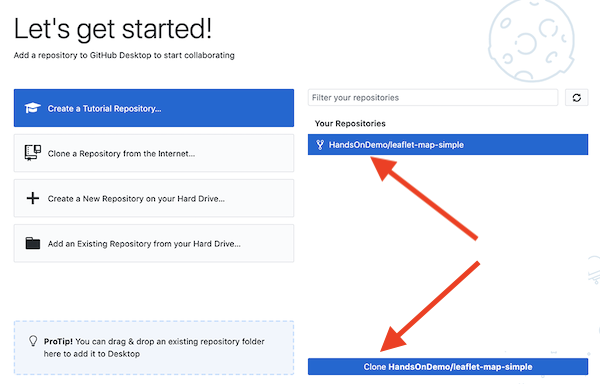
Figure 10.21: Select your leaflet-map-simple repo and click the Clone button to copy it to your local computer.
- When you clone a repo, GitHub Desktop asks you to select the Local Path, meaning the location where you wish to store a copy of your GitHub repo on your local computer, as shown in Figure 10.22. Before you click the Clone button, remember the path to this location, since you’ll need to find it later.
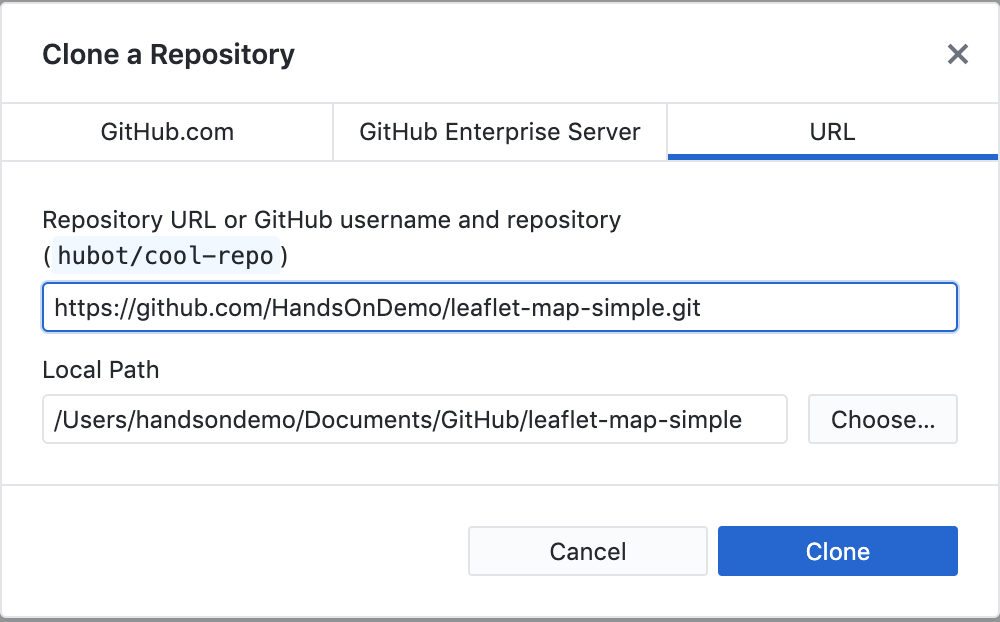
Figure 10.22: Select the Local Path where your repo will be stored on your computer, then click Clone.
- On the next screen, GitHub Desktop may ask, “How are you planning to use this fork?” Select the default entry “To contribute to the parent project,” which means you plan to send your edits back to your GitHub web account, and click Continue, as shown in Figure 10.23.
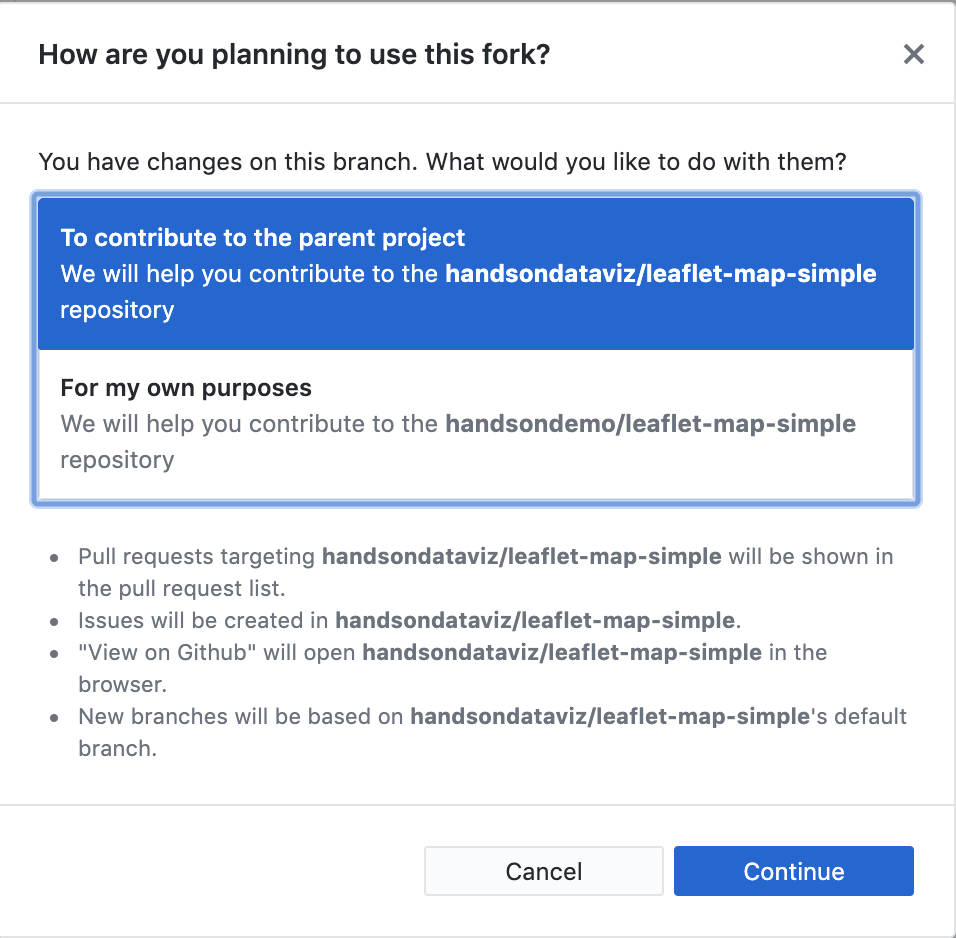
Figure 10.23: If asked how you plan to use this fork, select the default To contribute to the parent project and click Continue.
- Now you have copies of your GitHub repo in two places—in your GitHub web account and on your local computer—as shown in Figure 10.24. Your screen may look different, depending on whether you use Windows or Mac, and the Local Path you selected to store your files.
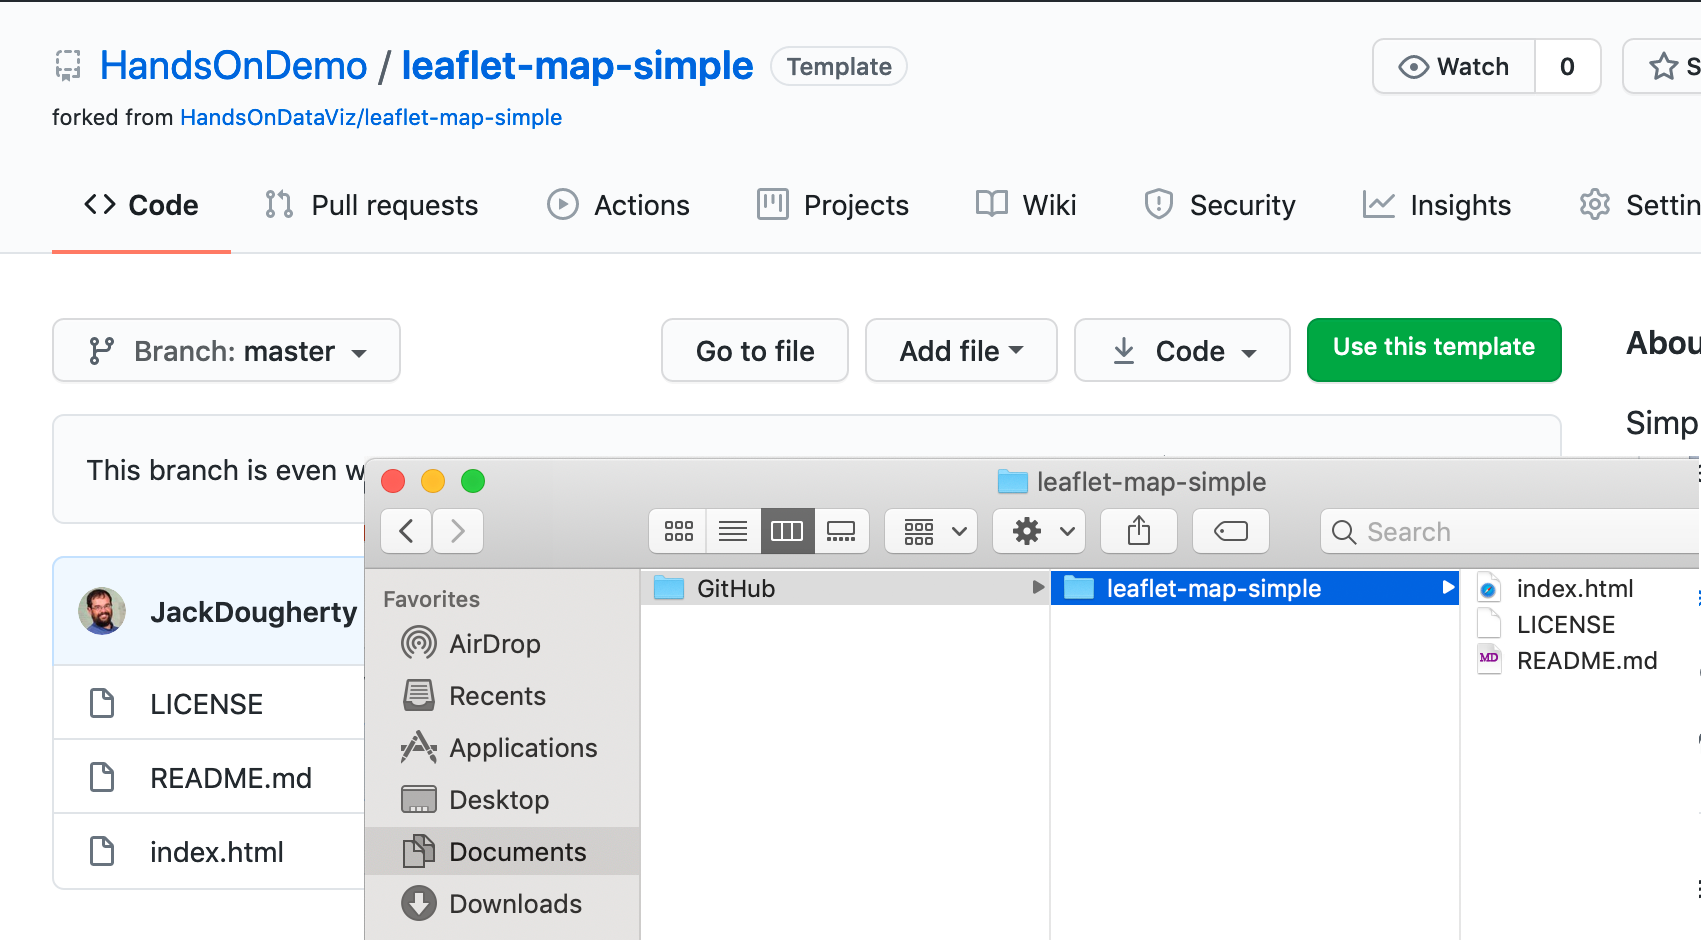
Figure 10.24: Now you have two copies of your repo: in your GitHub online account (on the left) and on your local computer (on the right, as shown in the Mac Finder). Windows screens will look different.
- Before we can edit the code in your local computer, download and install your favorite code editor, such as Pulsar. Then go to your GitHub Desktop screen, confirm that the Current Repository is
leaflet-map-simple, and click the Open in Editor button as shown in Figure 10.25, which shows our old favorite editor, Atom.
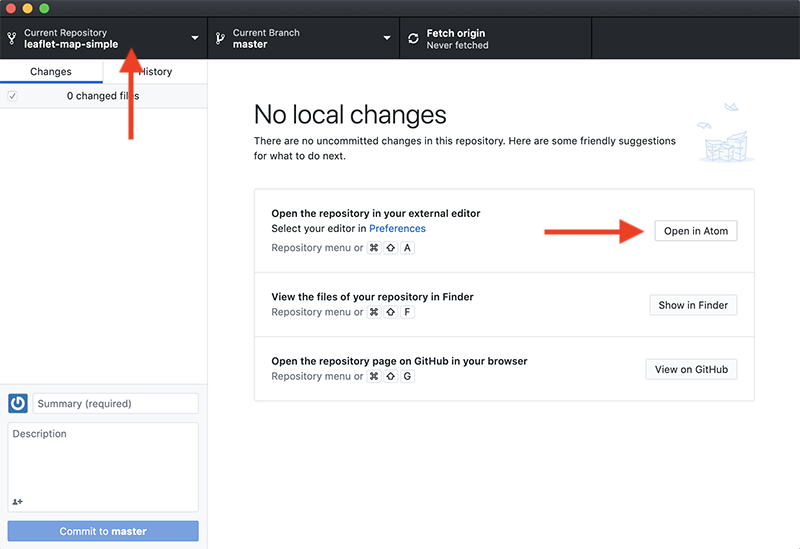
Figure 10.25: In GitHub Desktop, confirm the Current Repo and click the Open in Editor button to edit the code.
- A well-designed code editor opens up your entire repo as a “project,” where you can click files in the left window to open as new tabs to view and edit code, as shown in Figure 10.26. Open your
index.htmlfile and edit the title of your map, around line 22, then save your work.
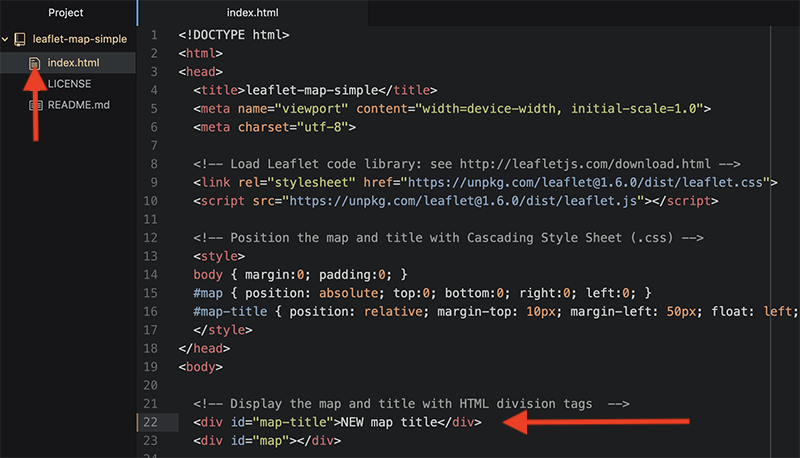
Figure 10.26: A well-designed code editor opens your repo as a project, where you can click files to view code. Edit your map title.
- After saving your code edit, it’s a good habit to clean up your code editor workspace. Right-click on the current Project and select Remove Project Folder in the menu, as shown in Figure 10.27. Next time you open up your editor, you can right-click to Add Project Folder, and choose any GitHub repo that you have copied to your local computer.
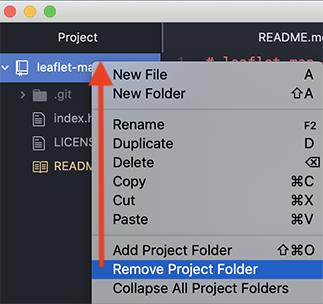
Figure 10.27: To clean up your code editor workspace, right-click to Remove Project Folder.
- Now that you’ve edited the code for your map on your local computer, let’s test how it looks before uploading it to GitHub. Go to the location where you saved the repo on your local computer, and right-click the
index.htmlfile, select Open With, and choose your preferred web browser, as shown in Figure 10.28.
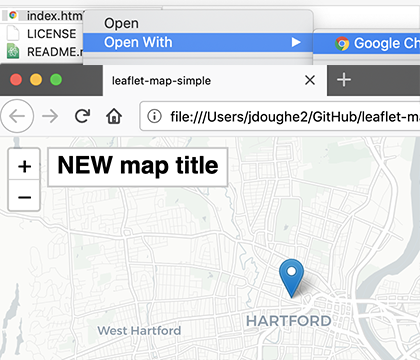
Figure 10.28: Right-click the index.html file on your local computer and open with a browser to check your edits.
Note: Since your browser is displaying only the local computer version of your code, the web address will begin with file:///... rather than https://..., as appears in your GitHub Pages online map. Also, if your code depends on online elements, those features may not function when viewing it locally. But for this simple Leaflet map template, your updated map title should appear, allowing you to check its appearance before pushing your edits to the web.
Sidebar: Launch a Local Web Server to Display More Complex Web Code
To fully view more complex code templates in your local browser, including some Chart.js or Highcharts templates in Chapter 11 or Leaflet templates in Chapter 12, you need to set up a simple web server that can display them without errors on your local computer. On Mac and Windows, you can easily launch the web server that’s built into the free Python code library (version 3 or higher), available from this Python download site. First, open either the Terminal application for Mac or the Terminal application for Windows and type in this command-line instruction: python -m http.server. Second, open your preferred web browser and enter this local computer address into the search bar: localhost:8000. You should see an index of folders on your local computer, so navigate to the folder containing your web code that you wish to view, as shown in Figure 10.29. If problems arise, see this Real Python help page. When done, enter CTRL+C to exit the Terminal, and quit your browser.

Figure 10.29: To launch a local web server to view more complex web code while you test it, type python -m http.server into Terminal (on left) and localhost:8000 into your browser (on right).
Now let’s transfer your edits from your local computer to your GitHub web account, which you previously connected when you set up GitHub Desktop.
- Go to GitHub Desktop, confirm that your Current Repo is
leaflet-map-simple, and you will see your code edits summarized on the screen. In this two-step process, first click the blue Commit button at the bottom of the page to save your edits to your local copy of your repo. (If you edit multiple files, GitHub Desktop will ask you write a summary of your edit, to help you keep track of your work.) Second, click the blue Push origin button to transfer those edits to the parent copy of your repo on your GitHub web account. Both steps are shown in Figure 10.30.
Figure 10.30: In this two-step process, click Commit, then click Push origin to save and copy your edits from your local computer to your GitHub web account, as shown in this animated GIF.
Congratulations! You’ve successfully navigated a round-trip journey of code, from your GitHub account to your local computer, and back again to GitHub. Since you previously used the GitHub Pages settings to create an online version of your code, go see if your edited map title now appears on the public web. The web address you set up earlier follows this format https://USERNAME.github.io/REPOSITORY, substituting your GitHub username and repo name.
While you could have made the tiny code edit above in the GitHub web interface, hopefully you’ve begun to see many advantages of using GitHub Desktop and Atom Editor to edit code and push commits from your local computer. First, you can make more complex code modifications with your editor tool, which includes search, find-and-replace, and other features to work more efficiently. Second, when you copy the repo to your local computer, you can quickly drag-and-drop multiple files and subfolders for complex visualizations, such as data, geography, and images. Third, depending on the type of code, you may be able to test how it works locally with your browser, before uploading your commits to the public web.
Tip: Pulsar has many built-in commands to help you edit code. One is View > Toggle Soft Wrap, which adjusts the right-hand margin to make long code strings visible on your screen. A second command is Edit > Toggle Comments, which automatically detects the coding language and converts the selected text from executable code to non-executed code comments. A third command is Edit > Lines > Auto Indent, which cleans up code indentation to make it more readable. Finally, you can install many more Pular packages in the Preferences menu.
GitHub also offers a powerful platform for collaborative projects. When two people work on a shared repository, one co-worker can “pull” the most recent version of the code to their local computer using GitHub Desktop, then “push” their edits (also called commits) back to the online GitHub repo. The other co-worker can “pull” and “push” from the same repo at the same time, though it’s simpler if they work on different files or sections of code. Both can see the changes that the other person made by selecting the GitHub repo Code tab and selecting a specific commit, which can be viewed line-by-line in green (additions) or red (deletions), as shown in Figure 10.31.

Figure 10.31: View commits made by co-workers on a shared GitHub repo.
Although GitHub does not operate like Google Documents, which displays live edits, the platform has several advantages when working collaboratively with code. First, since GitHub tracks every commit, it allows you to go back and restore a very specific past version of the code if needed. Second, when GitHub repos are public, anyone can view your code and submit an “issue” to notify the owner about an idea or problem, or send a “pull request” of suggested code edits, which the owner can accept or reject. Third, GitHub allows you to create different “branches” of a repo in order to make edits, and then “merge” the branches back together if desired. Occasionally, if two collaborators attempt to push incompatible commits to the same repo, GitHub will warn about a “Merge Conflict” and ask you to resolve it in order to preserve everyone’s work.
Many coders prefer to work on GitHub using its Command Line Interface (CLI), which means memorizing and typing specific commands directly into the Terminal application on Mac or Windows, but this is beyond the scope of this introductory book.
Summary
If this is the first time you’ve forked, edited, and hosted live code on the public web, welcome to the coding family! We hope you agree that GitHub is a powerful platform for engaging in this work and sharing with others. While beginners will appreciate the web interface, you’ll find that the GitHub Desktop and Atom Editor tools makes it much easier to work with Chart.js and Highcharts code templates in Chapter 11 and the Leaflet map code templates in Chapter 12. Let’s build on your brand-new coding skills to create more customized charts and maps in the next two chapters.