#StandWithUkraine - Stop the Russian invasion
Join us and donate. We are contributing all book royalties from 2022 to present to:
Save Life in Ukraine and Ukraine Humanitarian Appeal.
Split Data into Separate Columns
Sometimes multiple pieces of data appear in a single cell,
such as first and last names (John Doe), geographic coordinates (40.12,-72.12),
or addresses (300 Summit St, Hartford, CT, 06106). For your analysis,
you might want to split them into separate entities, so that your FullName
column (with John Doe in it) becomes FirstName (John) and LastName (Doe) columns,
coordinates become Latitude and Longitude columns, and your FullAddress column becomes
4 columns, Street, City, State, and Zip (postcode).
Example 1: Simple Splitting
Let’s begin with a simple example of splitting pairs of geographic coordinates, separated by commas, into separate columns.
Open the Split Coordinate Pairs sample data in Google Sheets, sign in with your account, and go to File > Make a Copy to create a version you can edit in your Google Drive.
Select the data you wish to split, either the full column or just several rows. Note that you can only split data from one column at a time.
Make sure there is no data in the column to the right of the one you’re splitting, because all data there will be written over.
Go to Data and select Split text to columns, as in Figure 4.5.
Google Sheets will automatically try to guess your separator. You will see that your coordinates are now split with the comma, and the Separator is set to Detect automatically in the dropdown. You can manually change it to a comma (
,), a semicolon (;), a period (.), a space character, or any other custom character (or even a sequence of characters, which we’ll discuss in Example 2 of this section).You can rename the new columns into Longitude (first number) and Latitude (second number).
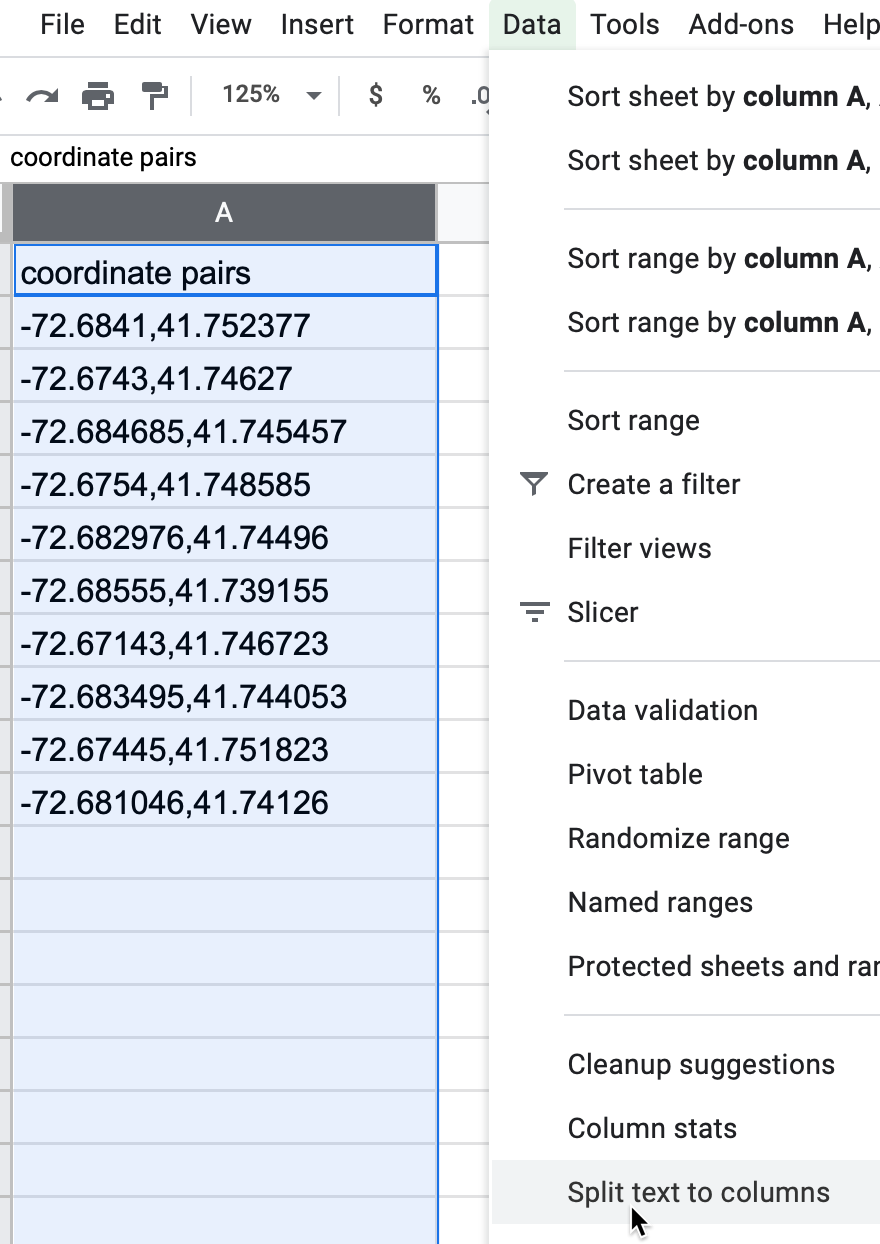
Figure 4.5: Select Data - Split text to columns to automatically separate data.
Example 2: Complex Splitting
Now, let’s look at a slightly more complicated example. Each cell contains a full address, which you want to split into four columns: street, city, state, and zipcode (postcode). But notice how the separators differ: a comma between street and city, a space between city and state, and two dashes between state and the zipcode. In this case, you’ll need to manually add some instructions to properly split the text into four columns.
| Location                          |
| --------------------------------- |
| 300 Summit St, Hartford CT--06106 |
| 1012 Broad St, Hartford CT--06106 |
| 37 Alden St, Hartford CT--06114   |
Open the Split Complex Address sample file in Google Sheets, sign in to your account, and go to File > Make a Copy to save a version in your Google Drive that you can edit.
Select the column and go to Data > Split text to columns to start splitting from left to right.
Google Sheets will automatically split your cell into two parts,
300 Summit StandHartford CT--06106, using comma as a separator. (If it didn’t, just select Comma from the dropdown menu that appeared).Now select only the second column and perform Split text to columns again. Google Sheets will automatically separate the city from the state and zip code, because it automatically chose a space as the separator. (If it did not, choose Space from the dropdown menu).
Finally, select only the third column and perform Split text to columns again. Google Sheets won’t recognize the two dashes as a separator, so you need to manually select Custom, type those two dashes (
--) in the Custom separator field, as shown in Figure 4.6, and press Enter. Now you have successfully split the full address into four columns.
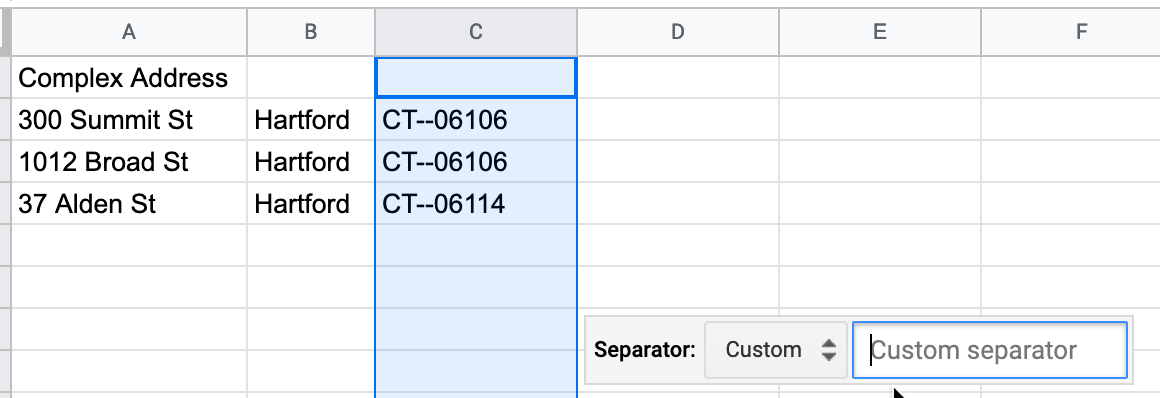
Figure 4.6: To split the last column, select a Custom separator and manually type in two dashes.
Tip: Google Sheets will treat zip codes as numbers and will delete leading zeros (so 06106 will become 6106). To fix that, select the column, and go to Format > Number > Plain text. Now you can manually re-add zeros. If your dataset is large, consider adding zeros using the formula introduced in the following section.